Christmas Sugar Cookies — Soft Cut-Outs That Hold Their Shape
Few holiday bakes are as satisfying as a tray of decorated christmas sugar cookies. The appeal is simple: buttery, tender cookies cut into trees, stars, snowflakes and candy canes, finished with smooth royal icing in festive colours. The frustration is just as familiar — cookies that spread in the oven until a star looks like a blob, edges that brown before the centres set, and icing that never quite hardens. This recipe solves all three problems with a dough designed not to spread, a chilling routine that protects the cut shapes, and a royal icing that dries to a smooth, stackable finish.
The secret to cut-out sugar cookies that hold their shape is restraint in the right places. The dough uses no leavening beyond a small amount of baking powder, so there is almost nothing pushing the cookies outward as they bake. The butter is softened, not melted, and the dough is chilled twice — once as a disc, and again after cutting — so the butter stays firm until the oven heat sets the structure. The cookies are rolled to a generous 1/4 inch thick, which keeps them soft in the centre while the edges turn just lightly golden. Rolled thinner, the same dough bakes crisp; rolled thicker, it stays almost cake-like. At 1/4 inch, the balance is exactly right for decorating: sturdy enough to hold icing, tender enough to bite cleanly.
Flavour matters as much as shape. The dough is scented with vanilla and a small amount of almond extract, a classic pairing that gives sugar cookies their unmistakable bakery flavour without tasting like extract. The almond note is subtle — a background warmth rather than a dominant flavour — and it pairs beautifully with royal icing, which is sweet on its own. For anyone who prefers a plainer cookie, the almond extract can simply be left out, and the vanilla increased slightly, with no other change to the method.
Royal icing is the other half of this recipe, and it is far less intimidating than it looks. Made from powdered sugar, meringue powder and water, it whips into a bright white icing that can be thinned to two consistencies: a thicker “outline” icing for piping borders, and a thinner “flood” icing for filling them in. The border holds the flood in place, and the flood settles into a smooth, flat surface as it dries — no special equipment beyond a piping bag and a small round tip, and a zip-top bag with a corner snipped off works in a pinch. Gel food colouring tints the icing without thinning it, which is why it is specified here instead of liquid colouring.
This is also a genuinely practical holiday recipe. The dough can be made up to three days ahead and refrigerated, or frozen for up to a month, so the busiest part of the work can be done long before decorating day. Baked undecorated cookies keep for a week in an airtight container and freeze well too, which means a large batch can be baked in one session and decorated in smaller, more relaxed sittings. For a cookie swap, a classroom party tray, or a quiet afternoon of decorating at the kitchen table, this is the recipe to keep on repeat all December.
One practical note before starting: measure the flour correctly. Spoon the flour into the measuring cup and level it off with a knife, rather than scooping directly from the bag. Scooping packs the flour down and can add as much as 25 percent extra flour to the dough, which makes the cookies dry and tough instead of soft. If a kitchen scale is available, weighing is even better — 375 grams of all-purpose flour is the exact amount this recipe is built around.
Why You'll Love These Christmas Sugar Cookies
They hold their shape: A low-spread dough, chilled twice, keeps trees looking like trees and stars looking like stars — no blob cookies.
Soft centres, clean edges: Rolled to 1/4 inch, the cookies stay tender inside with lightly golden edges that are sturdy enough to decorate.
Classic bakery flavour: Vanilla plus a whisper of almond extract gives the cookies their signature taste without any fussy ingredients.
Royal icing that actually sets: Meringue-powder royal icing dries smooth and hard enough to stack, so decorated cookies can be boxed and gifted.
Make-ahead friendly: The dough refrigerates for 3 days or freezes for a month, and baked cookies keep for a week before decorating.
Kid-friendly decorating: Big, sturdy cut-outs and two-consistency icing make this a forgiving project for less experienced decorators.
Perfect for gifting and swaps: 24 medium cookies per batch, a size that fills a gift box or a cookie-swap plate without doubling the recipe.
Ingredients You'll Need
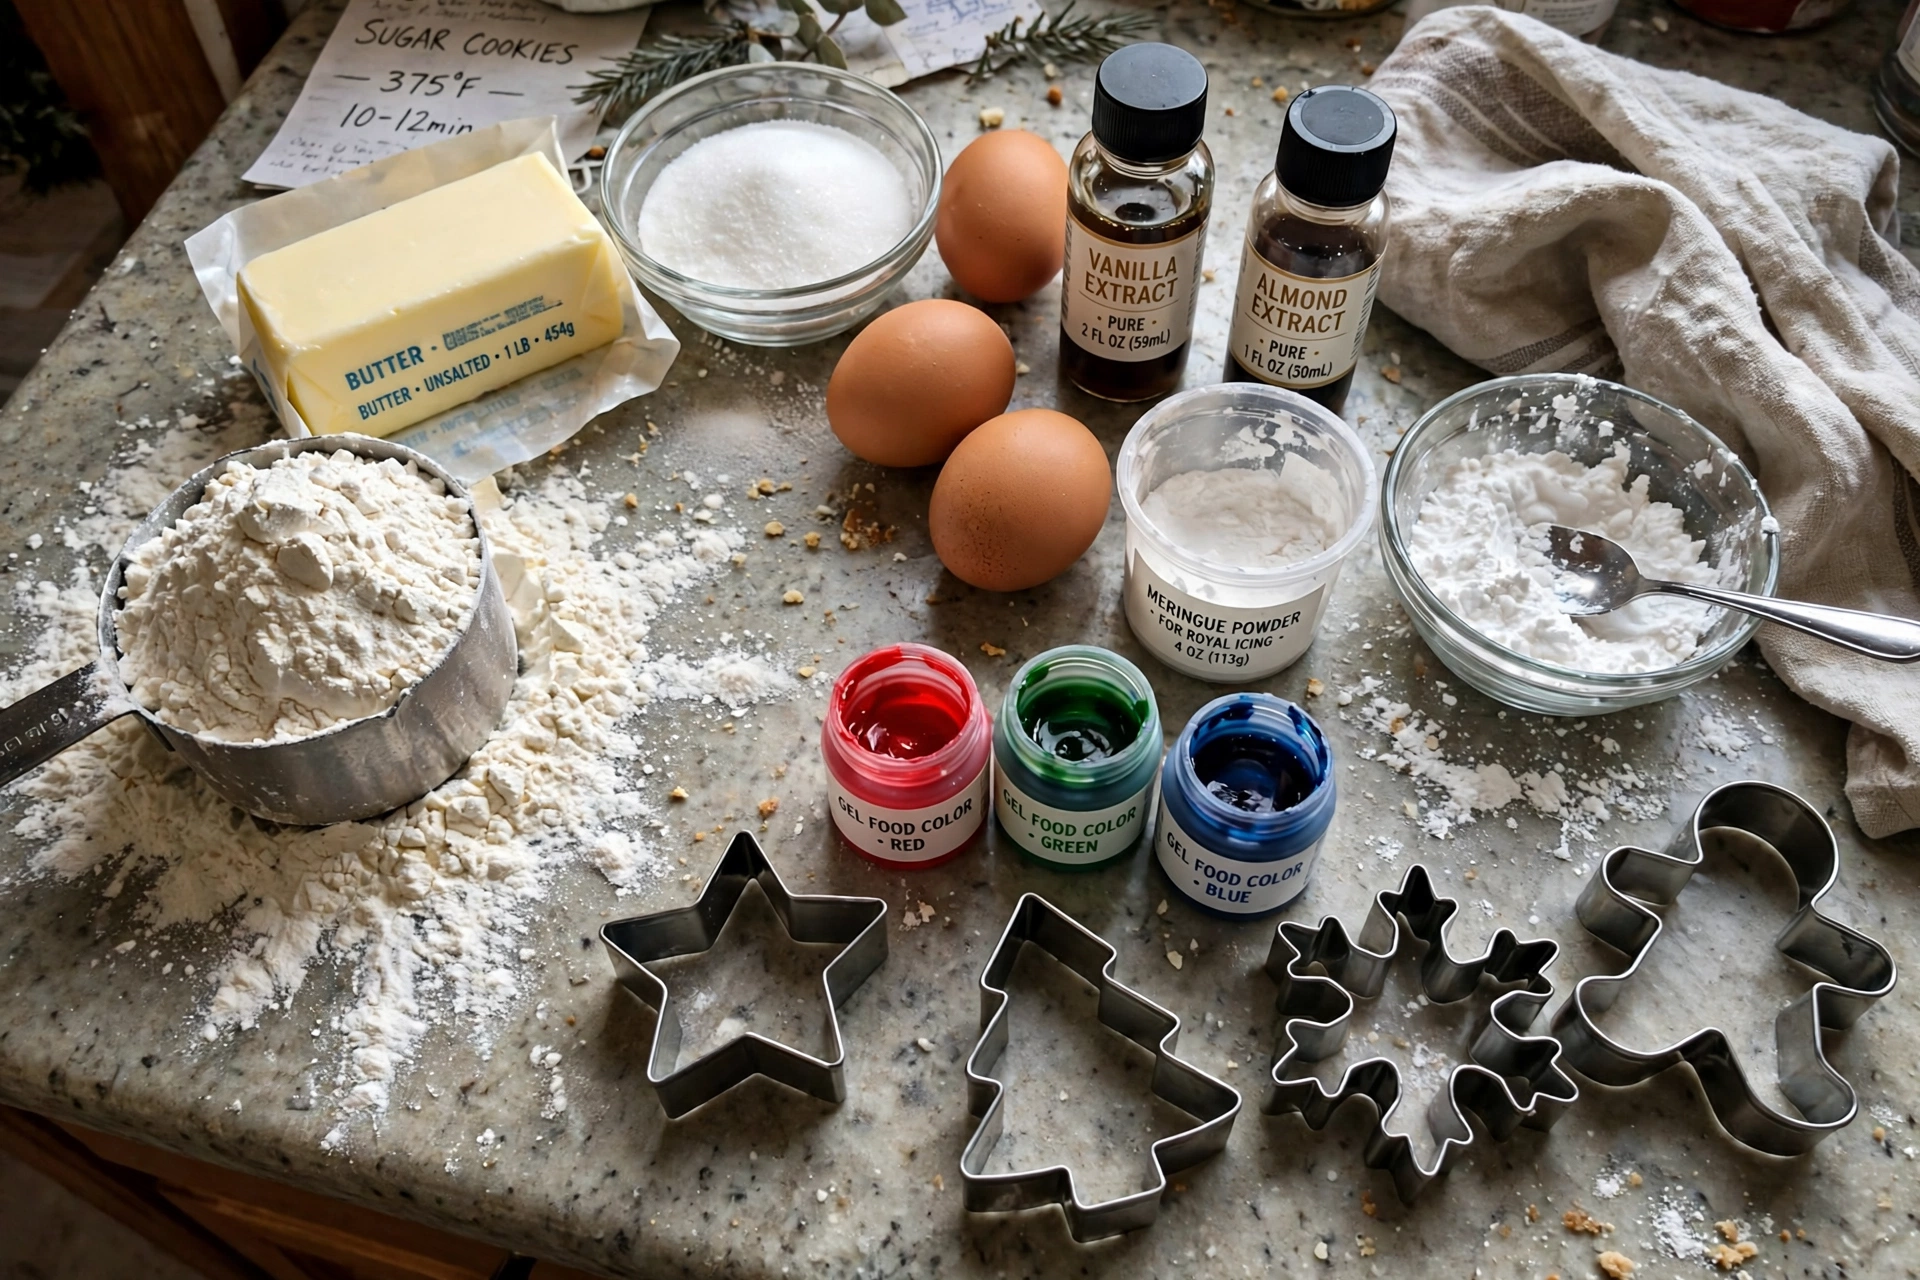
Christmas sugar cookies have a short ingredient list, and every ingredient has a job. Here is what each one does and why the recipe specifies it the way it does.
All-Purpose Flour
3 cups (375 g) of all-purpose flour, spooned and levelled or weighed. Flour is the structure of the cookie: it forms the network that holds the butter, sugar and egg together and gives the cut-outs their shape. All-purpose flour is specified rather than bread flour or cake flour because its moderate protein level produces a cookie that is tender but not crumbly — strong enough to hold a piped border, soft enough to bite. Measuring matters more here than in most recipes: too much flour makes dry, cracking dough, while too little makes dough that spreads. Spooning and levelling, or weighing 375 grams, removes the guesswork.
Baking Powder
1 teaspoon of baking powder. Baking powder is the only leavening in the dough, and it is deliberately kept small. A full tablespoon would puff the cookies and blur their edges; a teaspoon gives just enough lift to keep the centres soft without pushing the shapes outward. Check that the baking powder is fresh — it loses strength over time, and a tin that has been open for more than six months may not lift at all. Baking soda is not a substitute here: it would change both the spread and the flavour, since there is no acidic ingredient in the dough for it to react with.
Fine Salt
1/2 teaspoon of fine salt. Salt does quiet but essential work in a sugar cookie: it sharpens the butter flavour, balances the sweetness of the dough and the icing, and keeps the cookies from tasting flat. Fine salt is specified because it dissolves evenly into the dough; coarse kosher salt works at the same quantity if it is whisked thoroughly with the flour, but large flakes left undissolved can leave salty spots. Salted butter can be used instead of unsalted, in which case the added salt should be reduced to 1/4 teaspoon.
Unsalted Butter
1 cup (2 sticks / 226 g) of unsalted butter, softened to cool room temperature. Butter is the flavour and the tenderness of the cookie. Softened butter — cool to the touch, holding its shape when pressed, not greasy or melting — creams with the sugar into a light, fluffy base that traps tiny air pockets. Butter that is too warm or melted makes dough that spreads no matter how long it is chilled, so this is the single most common cause of lost shapes. Take the butter out of the refrigerator about 45 minutes before baking; it should dent when pressed with a finger but not slump. Unsalted butter is preferred so the salt level stays under control, but salted butter works with the adjustment noted above.
Granulated Sugar
1 cup (200 g) of granulated sugar. Granulated sugar sweetens the dough and helps the edges turn lightly golden in the oven. It is used instead of brown sugar deliberately: brown sugar adds moisture and acidity that soften the dough and encourage spreading, while white sugar keeps the cookies crisp at the edges and pale enough to show off the icing. The sugar also plays a structural role — creamed with the butter, it creates the air pockets that keep the texture light rather than dense.
Large Egg
1 large egg, at room temperature. The egg binds the dough together, adds richness, and contributes to the golden colour of the baked cookies. A room-temperature egg blends into the creamed butter and sugar far more smoothly than a cold one, which can make the mixture look curdled. To warm an egg quickly, place it in a bowl of warm (not hot) water for 5 to 10 minutes. One egg is the right amount for this quantity of flour: a second egg would make the dough softer and more cake-like, and would increase spreading.
Vanilla Extract
1 1/2 teaspoons of pure vanilla extract. Vanilla is the dominant flavour of a sugar cookie, and pure extract is worth using here because the flavour is front and centre — there is no chocolate or spice to hide behind. The vanilla goes in with the egg so it disperses evenly through the dough. Imitation vanilla works in a pinch, but its flavour is flatter, so the almond extract becomes more important as a backup note if imitation vanilla is used.
Almond Extract
1/2 teaspoon of almond extract (optional but recommended). Almond extract is the quiet signature of a classic bakery sugar cookie: a warm, almost cherry-like background note that makes the cookies taste like they came from a bakery rather than a plain sugar-cookie mix. The amount is deliberately small — almond extract is potent, and more than 1/2 teaspoon will dominate the vanilla. It can be omitted entirely for anyone with a nut allergy or a preference for a plainer cookie; in that case, increase the vanilla to 2 teaspoons and proceed exactly as written.
Royal Icing Ingredients
For the icing: 4 cups (480 g) of powdered sugar, sifted; 3 tablespoons of meringue powder; 6 tablespoons of water, plus more as needed for thinning; 1 teaspoon of clear vanilla extract; and a pinch of salt. Powdered sugar is the body of the icing, and sifting it removes lumps that would clog a piping tip. Meringue powder — dried egg whites with sugar and stabilisers — is what makes the icing dry hard and hold its shape; without it, the icing stays soft and smudges. Clear vanilla keeps the icing bright white, which matters when tinting pastel colours, though regular vanilla works if a slightly ivory icing is acceptable. Gel food colouring is specified for tinting because it adds intense colour without adding liquid, unlike liquid colouring, which thins the icing and weakens the set.
Recommended Equipment
Stand mixer or electric hand mixer (a sturdy wooden spoon works, but creaming takes longer)
Large mixing bowl
Medium bowl and whisk (for the dry ingredients)
Rolling pin with 1/4-inch guides if available (or two 1/4-inch dowels as guides)
Piping bags and small round piping tips (Wilton #2 or #3, or similar)
Small bowls and spoons for tinting icing
Toothpick or scribe tool (for guiding flood icing into corners)
Kitchen scale (optional, but the most accurate way to measure flour)
How to Make Christmas Sugar Cookies
1. Whisk the Dry Ingredients
In a medium bowl, whisk together the 3 cups of flour, 1 teaspoon of baking powder and 1/2 teaspoon of fine salt until evenly combined. Whisking matters here: it distributes the baking powder through the flour so every cookie rises evenly, and it breaks up any small lumps in the flour. Set the bowl aside. Do not add the dry ingredients to the butter mixture all at once later — adding them in two parts keeps the dough from becoming tough.
2. Cream the Butter and Sugar
In a large bowl, beat the softened butter and 1 cup of granulated sugar with a mixer on medium speed for 2 to 3 minutes, until the mixture is pale, fluffy and noticeably lighter in colour. Scrape down the sides of the bowl halfway through so no unmixed butter remains. Proper creaming is what gives the cookies their light texture: the beating action traps air in the butter-sugar mixture, and those air pockets expand gently in the oven. Stop as soon as the mixture is fluffy — over-beating beyond this point warms the butter and works against the chilling steps that follow.
3. Beat in the Egg and Extracts
Beat in the egg, 1 1/2 teaspoons of vanilla extract and 1/2 teaspoon of almond extract (if using) on medium speed until fully combined, about 30 seconds. Scrape down the bowl again. The mixture should look smooth and creamy; if it looks slightly curdled, that is usually because the egg was cold, and it will come back together once the flour is added. Do not add extra egg to fix the appearance — the proportions are balanced as written.
4. Mix in the Dry Ingredients and Form the Dough
With the mixer on low speed, add the flour mixture in two additions, mixing just until the flour disappears after each addition. The dough will look crumbly at first and then come together into a soft, smooth mass. Stop mixing as soon as the last streaks of flour vanish — over-mixing develops gluten and makes the cookies tough instead of tender. Turn the dough out onto a clean surface, press it gently into a flat disc about 1 inch thick, and wrap it tightly in plastic wrap. Flattening the dough into a disc, rather than leaving it as a ball, means it chills evenly and rolls out more easily later.
5. Chill the Dough
Refrigerate the wrapped dough for at least 1 hour, and up to 3 days. Chilling firms the butter, which is the main defence against spreading, and it lets the flour hydrate fully, which improves both flavour and texture. If the dough has been refrigerated for more than a few hours, let it sit at room temperature for 10 to 15 minutes before rolling so it does not crack. Dough that cracks at the edges while rolling is simply too cold — let it warm a few more minutes and press the cracks back together.
6. Roll Out and Cut the Cookies
Preheat the oven to 350°F (175°C) and line baking sheets with parchment paper. On a lightly floured surface, roll the dough out to 1/4 inch thick, turning it a quarter-turn after every few rolls so it stays even and does not stick. Cut out shapes with floured cookie cutters, pressing straight down without twisting — twisting seals the edges and prevents an even rise. Place the cut-outs about 1 inch apart on the prepared baking sheets. Gather the scraps, press them together gently (do not knead), re-roll once, and cut again; a second re-roll is fine, but dough re-rolled more than twice becomes tough. For the sharpest shapes, slide the whole baking sheet of cut-outs into the refrigerator for 10 to 15 minutes while the oven finishes preheating — this second chill is the step that most reliably prevents spreading.
7. Bake Until Just Set
Bake one sheet at a time in the centre of the oven for 10 to 12 minutes, until the cookies look set and matte on top and the edges are just beginning to turn the faintest gold. Do not wait for deep browning — sugar cookies continue to firm up as they cool, and cookies that look fully golden in the oven will be crisp rather than soft once cooled. Smaller or thinner cutters may need only 9 to 10 minutes, while larger shapes may need the full 12; check the first batch a minute early to learn the timing for the oven being used. Cool the cookies on the baking sheet for 5 minutes, then transfer them to a wire rack to cool completely before icing. Warm cookies melt royal icing on contact, so complete cooling is not optional.
8. Make the Royal Icing
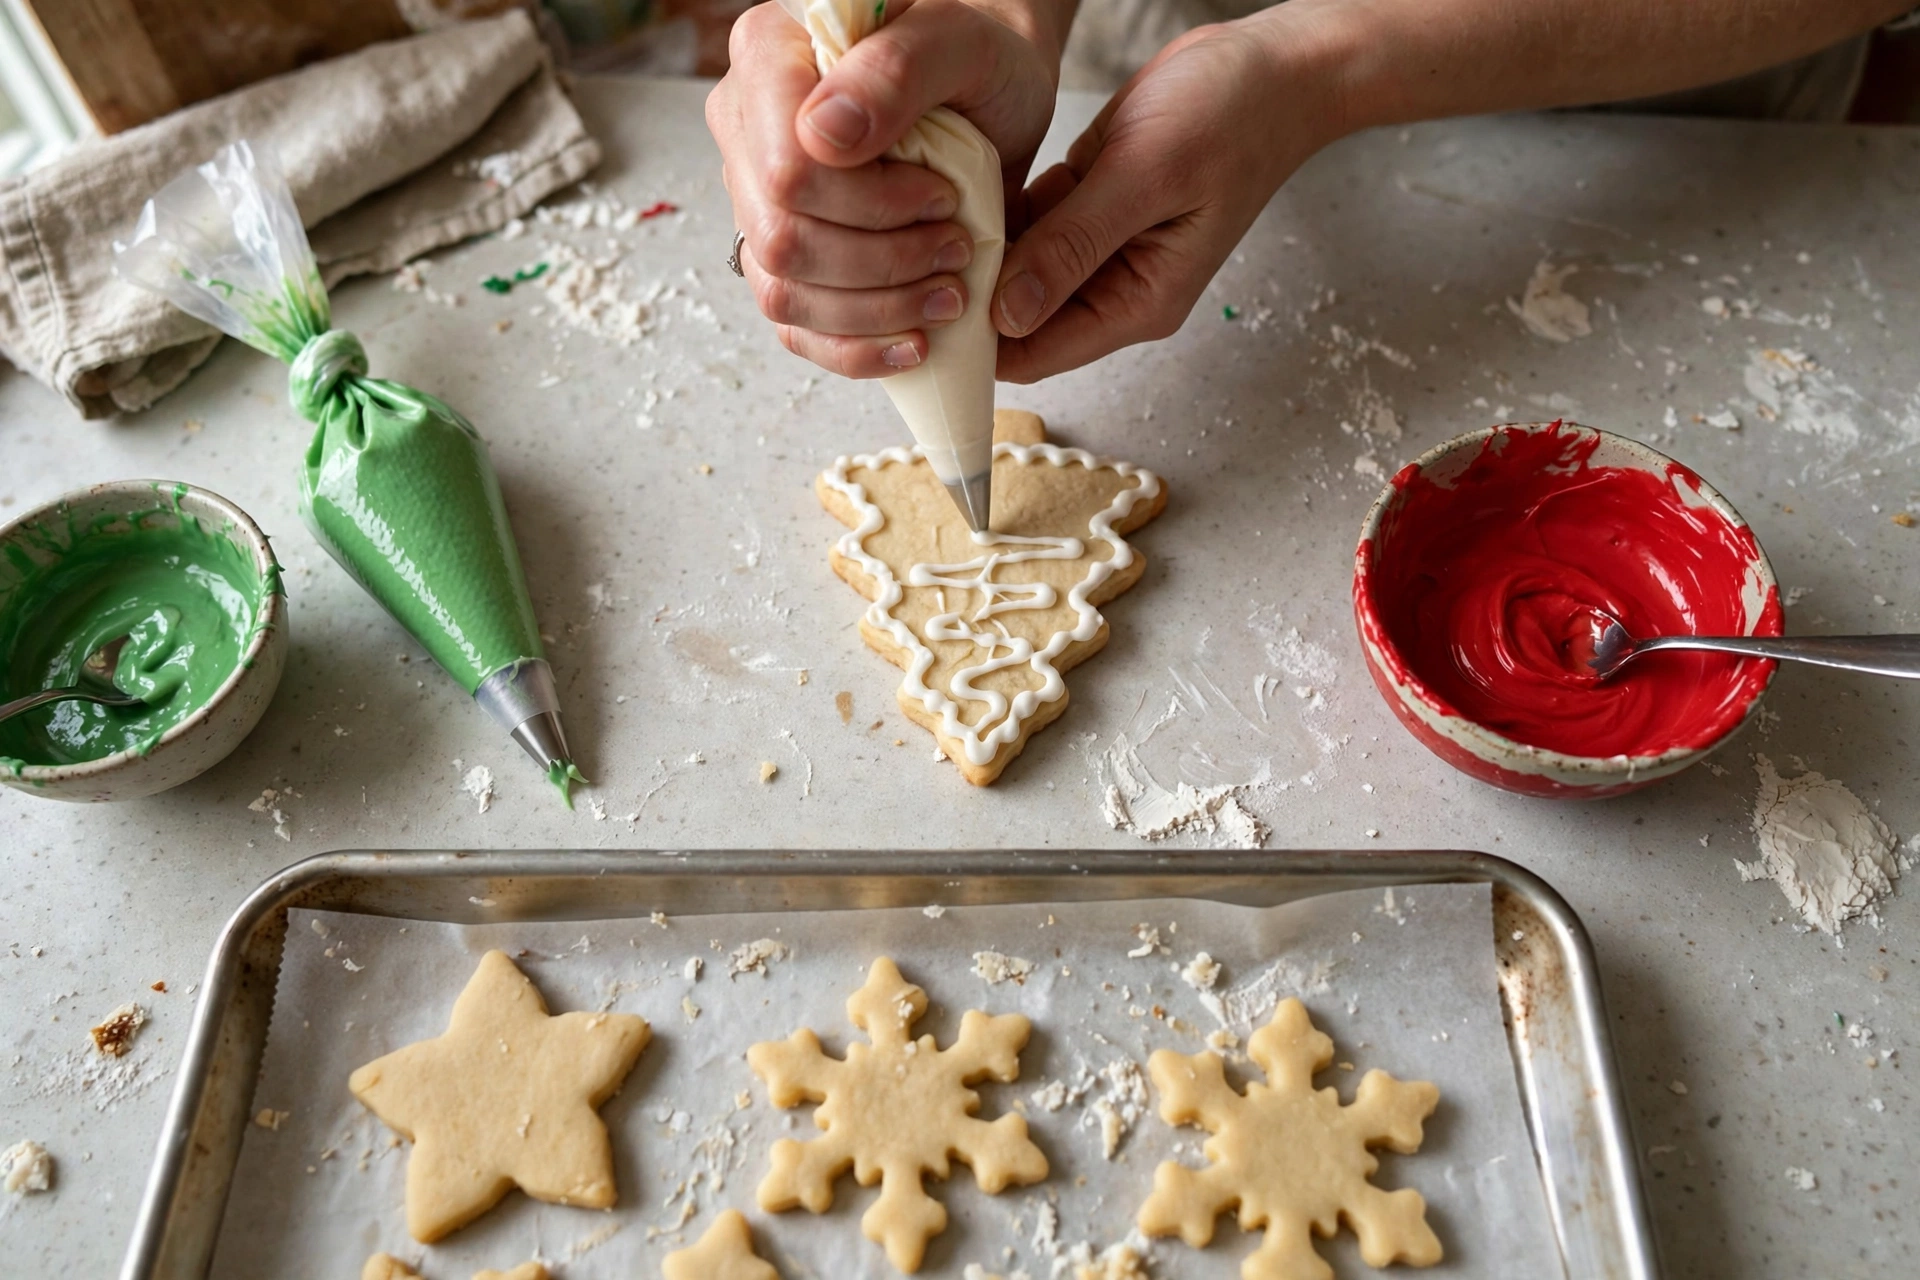
Sift the powdered sugar into a large bowl, then whisk in the meringue powder and the pinch of salt. Add 6 tablespoons of water and 1 teaspoon of clear vanilla extract, and beat with a mixer on low speed until combined, then on medium-high speed for 4 to 5 minutes, until the icing is bright white, glossy and holds stiff peaks. This is the “outline” consistency: thick enough to pipe a clean border that holds its shape. For “flood” icing, transfer a portion to a separate bowl and stir in water 1 teaspoon at a time until the icing flows off a spoon in a thick ribbon and settles smooth within about 10 to 15 seconds (the “15-second icing” test). Keep both consistencies covered with a damp cloth or plastic wrap pressed onto the surface whenever they are not being used — royal icing forms a crust within minutes when exposed to air.
9. Outline and Flood the Cookies
Divide the icing into small bowls and tint with gel food colouring — a little goes a long way, so add colour with a toothpick and mix thoroughly before adding more. Fill a piping bag fitted with a small round tip with outline icing, and pipe a border just inside the edge of each cooled cookie. Let the borders set for a few minutes, then fill each border with flood icing, using a toothpick or scribe tool to guide the icing gently into the corners. Do not overfill: the icing should sit level with the border, not dome above it. For a marbled or wet-on-wet effect (such as dots or swirls dragged through the wet flood icing), work while the flood icing is still wet; for layered details (such as a tree trunk on a flooded tree, or eyes on a snowman), let the base layer dry for at least 1 hour first, or the detail will sink and blur.
10. Let the Icing Dry Completely
Let the decorated cookies dry uncovered at room temperature for at least 8 hours, and ideally overnight, before stacking, boxing or packing them. Royal icing feels dry to the touch within an hour or two, but the centre of a flooded cookie takes much longer to harden all the way through. Stacking cookies before they are fully dry is the most common cause of smudged designs. A fan on low, or a dehumidifier in a humid kitchen, speeds drying without affecting the finish; do not use the oven or direct heat, which can crack the icing and discolour it.
Pro Tips for Perfect Christmas Sugar Cookies
Keep everything cool. Cool butter, chilled dough, and a second chill after cutting are the three defences against spreading. If the kitchen is warm, work with half the dough at a time and keep the rest refrigerated. Dough that feels soft and sticky is telling the baker it needs more chilling time, not more flour — adding flour at that stage makes tough cookies.
Roll to exactly 1/4 inch. Thickness is the difference between a soft cookie and a crisp one, and between a sturdy decorating surface and a fragile one. Rolling guides, or two 1/4-inch dowels placed on either side of the dough, take the guesswork out of this step and keep every cookie in the batch the same thickness, so they bake evenly.
Do not twist the cutters. Pressing straight down and lifting straight up gives clean edges that rise evenly. Twisting seals the cut edge, which makes the cookie rise unevenly and can blur the shape in the oven.
Bake one sheet at a time. A single sheet in the centre of the oven bakes more evenly than two sheets competing for heat. If two sheets must go in together, rotate them halfway through and accept that the timing may vary slightly between the top and bottom racks.
Judge doneness by the centres, not the edges. The cookies are done when the centres look set and matte, even if the edges are still very pale. Waiting for golden edges produces a crisp cookie. The first batch is the test batch — check it at 9 minutes, note the timing, and use it for the rest.
Cover royal icing at all times. A bowl of uncovered royal icing crusts over in minutes, and crusted bits clog piping tips and leave lumps in the flood icing. Keep a damp cloth over every bowl, and press plastic wrap directly onto the surface of any icing that will sit for more than a few minutes.
Tint icing before thinning it. Gel colour added to stiff outline icing mixes evenly and predictably. Colour added to already-thinned flood icing is harder to judge, and stirring in more colour can accidentally thin the icing further. Mix colours in the stiff icing, then thin each colour to flood consistency.
Variations
Chocolate-Dipped Sugar Cookies
Bake and cool the cookies as written, but skip the royal icing. Melt 8 ounces of chopped dark or white chocolate with 1 teaspoon of coconut oil, dip half of each cookie into the chocolate, and set on parchment paper to set. Sprinkle with crushed candy canes or festive sprinkles while the chocolate is still wet. The chocolate sets faster than royal icing (about 30 minutes) and gives a simpler, crunchier finish.
Sprinkle Sugar Cookies (No Icing)
For a faster version, skip the royal icing entirely. Before baking, brush the cut-outs very lightly with water or beaten egg white and sprinkle with coloured sanding sugar or nonpareils. The sugar bakes onto the surface and gives the cookies a sparkling, festive look with no drying time at all. These are the best choice when the cookies need to be ready the same day.
Peppermint Sugar Cookies
Add 1/2 teaspoon of peppermint extract along with the vanilla, and omit the almond extract. Decorate with white and red royal icing, and finish with a light sprinkle of crushed candy canes pressed gently into the wet flood icing. The peppermint note is strong, so the 1/2 teaspoon measure should not be increased — more peppermint quickly tastes medicinal.
Lemon Sugar Cookies
Replace the almond extract with 1 tablespoon of finely grated lemon zest and 1 teaspoon of lemon juice, added with the egg. The lemon version is bright and less sweet-tasting, and it pairs well with a simple white royal icing or a plain lemon glaze (1 cup powdered sugar whisked with 2 tablespoons of lemon juice). This variation is a good choice for a cookie tray that already has several chocolate and spice cookies.
Spiced Christmas Sugar Cookies
Add 1 teaspoon of ground cinnamon, 1/4 teaspoon of ground ginger and a pinch of nutmeg to the dry ingredients. The spiced dough is darker and more aromatic, sitting halfway between a sugar cookie and a gingerbread cookie, and it pairs beautifully with white royal icing. The spice does not change the baking time or the chilling routine.
Ingredient Substitutions
No almond extract? Omit it and increase the vanilla to 2 teaspoons. The cookies will taste slightly plainer but still recognisably like sugar cookies, and nothing else in the method changes. For a nut-free table, omitting the almond extract is the recommended route, since almond extract is derived from almonds.
No meringue powder? Royal icing can be made with pasteurised egg whites instead: beat 2 pasteurised egg whites with 4 cups of sifted powdered sugar and 1 teaspoon of clear vanilla until stiff peaks form, then thin as needed. The icing made this way dries slightly less hard and is more sensitive to humidity, so allow a full overnight dry. A simple powdered-sugar glaze (powdered sugar + milk) is not a substitute for royal icing if stackable, decorated cookies are the goal — glaze stays soft and smudges.
No unsalted butter? Salted butter works at the same quantity; reduce the added fine salt from 1/2 teaspoon to 1/4 teaspoon. The cookies will taste essentially the same, since the difference in salt between salted and unsalted butter is small.
No stand mixer? A hand mixer works equally well for creaming and for the icing. Mixing by hand with a wooden spoon is possible for the dough, but creaming butter and sugar by hand takes 4 to 5 minutes of vigorous beating, and royal icing beaten by hand rarely reaches the stiff peaks that make piping clean — a mixer is strongly recommended for the icing.
No gel food colouring? Liquid food colouring can be used, but it must be added sparingly and only to the stiff outline icing, since it thins the icing. Add one drop at a time, mix thoroughly, and expect paler colours than gel colouring produces. Natural colourings (beet powder for pink, matcha for green, turmeric for yellow) work in small amounts, but they can alter the flavour if used heavily, so they are best reserved for pale tints.
Dietary Notes
As written, these cookies contain gluten (wheat flour), dairy (butter), and egg — in both the dough and the royal icing (meringue powder is derived from egg whites). They are vegetarian as written. For a nut-free version, omit the almond extract and increase the vanilla to 2 teaspoons, as described above; also check that the sprinkles or decorations used contain no nut traces if the cookies are for a nut-allergic guest.
A gluten-free version is possible but not a straight swap: use a 1-to-1 gluten-free baking flour blend that contains xanthan gum, measured at the same weight (375 g). Gluten-free dough is softer and stickier, so it needs the full chilling time and benefits from being rolled between two sheets of parchment paper rather than on a floured surface. Expect slightly more delicate cookies that spread a touch more — chilling the cut-outs for a full 20 minutes before baking helps. Dairy-free cookies can be made with a firm plant-based butter substitute used at the same quantity, though the flavour will be less rich and the texture slightly softer; soft tub-style spreads are not suitable, since they contain too much water and cause spreading. There is no practical egg-free version of the royal icing that dries as hard as meringue-powder icing; an egg-free glaze will stay soft and cannot be stacked.
Make-Ahead, Storage & Freezing
Make ahead: The dough can be refrigerated, tightly wrapped, for up to 3 days, or frozen for up to 1 month. Thaw frozen dough in the refrigerator overnight before rolling. Baked, undecorated cookies can be made up to a week ahead and stored in an airtight container at room temperature, which splits the work into a baking day and a decorating day — the most relaxed way to handle a large batch.
Storage: Undecorated cookies keep for up to 1 week in an airtight container at room temperature, layered between sheets of parchment paper. Decorated cookies, once the icing is fully dry (at least 8 hours, ideally overnight), keep for up to 2 weeks in an airtight container at room temperature, again layered between parchment paper. Keep decorated cookies away from humidity, which softens royal icing. Do not refrigerate decorated cookies unless necessary — condensation in the refrigerator can spot and soften the icing.
Freezing: Baked, undecorated cookies freeze for up to 3 months in an airtight container or freezer bag, layered between parchment paper. Thaw at room temperature before decorating. Decorated cookies can also be frozen, but with more risk: freeze them in a single layer on a baking sheet until the icing is solid, then transfer to an airtight container with parchment between layers, and freeze for up to 1 month. Thaw decorated cookies uncovered at room temperature so condensation does not settle on the icing.
Reheating: Sugar cookies are not reheated — they are eaten at room temperature. If a stored cookie has gone slightly soft in humid weather, a brief 5 minutes in a 300°F (150°C) oven, followed by complete cooling on a rack, will re-crisp the edges, but this should only be done for undecorated cookies, since heat damages royal icing.
Food safety: Royal icing made with meringue powder is shelf-stable once dry, since meringue powder is pasteurised and dried. If egg-white royal icing is used instead, use pasteurised egg whites only, and do not leave iced cookies at warm room temperature for extended periods. Discard any cookies that have been left out at a party for more than a few hours in warm conditions, and keep raw dough refrigerated — dough containing raw egg should not sit at room temperature for more than 2 hours total, including rolling and cutting time.
What to Serve With Christmas Sugar Cookies
Christmas sugar cookies are the centrepiece of a holiday cookie tray, and they pair best with other cookies that contrast in flavour and texture rather than repeating the same buttery sweetness. On the site, the natural companions are our Soft Gingerbread Cookies — spiced and soft, a darker counterpoint to the pale, vanilla-scented sugar cookies — and our Chewy Snickerdoodles, whose cinnamon-sugar coating adds a warm spice note to the tray. Our Peanut Butter Blossoms add a chocolate-and-peanut contrast, and our Olive Oil Sugar Cookies offer a lighter, citrus-leaning alternative for guests who prefer a less sweet cookie.
For drinks, the classic pairing is a mug of our Crockpot Hot Chocolate — the rich chocolate is a natural match for a sweet, buttery cookie, and a hot-chocolate-and-cookie station is an easy, self-serve setup for a holiday gathering. Cold milk, coffee, or spiced cider all work equally well, and for a dessert table, the cookies sit happily next to a slice of our Classic Apple Pie or a serving of our Classic Pumpkin Pie.
For a holiday party table, the cookies also work as the sweet finish after savoury finger foods — for example, alongside our Pumpkin Cheese Ball and our Mummy Hot Dogs for a casual gathering, or as the dessert course after our KFC-style crispy fried chicken for a family dinner. For gifting, pack 4 to 6 fully dried cookies in a tin or box lined with parchment paper, with parchment between layers — a small, thoughtful gift that travels well and keeps for two weeks.
Recipe Notes
Measure flour by spooning and levelling, or by weight (375 g) — scooping from the bag packs in extra flour and dries the cookies out.
Keep the butter cool and softened, never melted; chill the dough for at least 1 hour and chill the cut-outs again for 10 to 15 minutes before baking.
Roll to 1/4 inch thick; press cutters straight down without twisting.
Bake at 350°F (175°C) until the centres look set and matte and the edges are just faintly gold — do not wait for deep browning.
Cool cookies completely before icing; let decorated cookies dry at least 8 hours, ideally overnight, before stacking.
Best season: Winter / Christmas holidays.
Cooking temperature: 350°F (175°C) oven.
Difficulty: Easy.
Food safety: keep raw dough refrigerated and do not leave it at room temperature for more than 2 hours total; use pasteurised egg whites if making egg-white royal icing; let icing dry fully before stacking.
Soft, buttery cut-out sugar cookies with vanilla and a whisper of almond, decorated with smooth royal icing that dries hard enough to stack — the classic Christmas cookie that holds its shape.
For the cookies
3cups all-purpose flour (375 g, spooned and levelled)
1tsp baking powder
1/2tsp fine salt
1cup unsalted butter (226 g, softened)
1cup granulated sugar (200 g)
1 large egg (at room temperature)
1 1/2tsp pure vanilla extract
1/2tsp almond extract (optional; omit for nut-free and increase vanilla to 2 tsp)
For the royal icing
4cups powdered sugar (480 g, sifted)
3tbsp meringue powder
6tbsp water (plus more as needed for thinning)
1tsp clear vanilla extract
1pinch salt
gel food colouring (as desired)
Instructions
How to Make Christmas Sugar Cookies
1
Whisk the Dry IngredientsWhisk together the flour, baking powder and salt in a medium bowl until evenly combined; set aside.
2
Cream the Butter and SugarBeat the softened butter and sugar on medium speed for 2 to 3 minutes until pale and fluffy, scraping down the bowl halfway through.
3
Beat in the Egg and ExtractsBeat in the egg, vanilla extract and almond extract (if using) until smooth and fully combined, about 30 seconds.
4
Mix in the Dry Ingredients and Form the DoughOn low speed, add the flour mixture in two additions, mixing just until the flour disappears; press the dough into a 1-inch-thick disc, wrap tightly, and refrigerate.
5
Chill the DoughRefrigerate the dough for at least 1 hour (up to 3 days); if chilled for several hours, let it sit at room temperature for 10 to 15 minutes before rolling.
6
Roll Out and Cut the CookiesPreheat the oven to 350°F (175°C). Roll the dough to 1/4 inch thick, cut shapes with floured cutters pressed straight down, place 1 inch apart on parchment-lined baking sheets, and chill the cut-outs for 10 to 15 minutes.
7
Bake Until Just SetBake one sheet at a time for 10 to 12 minutes, until the centres look set and matte and the edges are just faintly gold; cool 5 minutes on the sheet, then transfer to a wire rack to cool completely.
8
Make the Royal IcingBeat the sifted powdered sugar, meringue powder, salt, water and clear vanilla on low until combined, then on medium-high for 4 to 5 minutes until stiff peaks form; thin a portion with water 1 teaspoon at a time for flood consistency.
9
Outline and Flood the CookiesTint the icing with gel food colouring, pipe an outline border inside the edge of each cooled cookie, let it set briefly, then flood with thinned icing, guiding it into corners with a toothpick.
10
Let the Icing Dry CompletelyDry the decorated cookies uncovered at room temperature for at least 8 hours, ideally overnight, before stacking, boxing or packing.
Nutrition Facts
Servings 24
Amount Per Serving
Calories240kcal
% Daily Value *
Total Fat8g13%
Saturated Fat5g25%
Sodium70mg3%
Total Carbohydrate40g14%
Dietary Fiber1g4%
Sugars28g
Protein2g4%
* Percent Daily Values are based on a 2,000 calorie diet. Your daily value may be higher or lower depending on your calorie needs.
Note
Measure flour by spooning and levelling, or by weight (375 g) — scooping from the bag packs in extra flour and makes dry, tough cookies.Keep the butter cool and softened, never melted; chill the dough for at least 1 hour and chill the cut-outs for 10 to 15 minutes before baking.Roll to 1/4 inch thick; press cutters straight down without twisting.Bake at 350°F (175°C) until the centres look set and matte and the edges are just faintly gold — do not wait for deep browning.Cool cookies completely before icing; let decorated cookies dry at least 8 hours, ideally overnight, before stacking.Best season: Winter / Christmas holidays. Cooking temperature: 350°F (175°C) oven. Difficulty: Easy.Food safety: keep raw dough refrigerated and do not leave it at room temperature for more than 2 hours in total; use pasteurised egg whites if making egg-white royal icing; let icing dry fully before stacking. Discard cookies left out at a warm party for more than a few hours.Nutrition values are estimates calculated from this recipe's ingredients and will vary with the brands used, the exact icing thickness, the cookie size, and the serving size.
Keywords:
christmas sugar cookies, cut out sugar cookies, sugar cookies with royal icing, easy christmas cookies
Pin this recipe to share with your friends and followers.
Laura
Our Family Taste author
Laura is the home cook and founder of Our Family Taste, sharing easy family recipes, comforting favorites, simple desserts, and practical cooking ideas for everyday life.